Showing posts with label Setting. Show all posts

Sunday, 8 March 2015

Arakasha Society, Culture and Ritual, pt1

Society, Culture and Ritual

“Abaskara, know that all of you are one body.  You are one body among yourselves and you are one body with the clan.  Does it surprise you to know that you are one body with all Arakasha?  Why then do the Clans contest with one another?  To make the body stronger, weakness must be cast off and discarded.  This is the way of the Velo, the lore that shapes.”
The Black Velo Codex

Strangely the Arakashas are the only people in Khardan who are asexual; they are neither male nor female. Every Arakasha carries within itself the capability to propagate its kind.  According to tradition, when an Arakasha decides it is time, it chooses a future mentor and care-giver called a Sar. During the birth cycle it is the sar’s duty to defend and aid the gestating Arakasha or bateh (the Arakasha word for parent). When a sar is chosen and accepts this future responsibility the bateh will commence to gestate young in its belly for a period of eleven months. When the child is ready to be born, the Arakasha will be gripped with racking pain within its swollen abdomen. The sar then initiates the ritual known as Sarakis. During sarakis the sar slices open the bateh’s midsection lengthwise with its own styts, freeing the newborn. In the last stage of the ceremony the sar then opens one of his own veins and the child’s first meal is blood. This blood confers upon the child some of the characteristics of the sar. For a few months the child's only sustenance is the blood of the sar and other clan members. This nourishment helps the child grow and take on additional characteristics that differentiate it from its bateh. Once it matures it may consume meats and vegetables.


The position of Sar does not end with sarakis. A sar will also act as a lifelong mentor and teacher once the child approaches maturity. The tradition of choosing a sar is sacred and comes from the teachings of Velo. On occasion this tradition has been broken when an Arakasha is an outcast or circumstances dictate otherwise. Whatever the reasons the breaking of this tradition brings permanent dishonor on both parent and child. In some instances the child is killed, if not it will die shortly after from a lack of blood. No clan member will be the first to feed a new born unless they have been named Sar, it is taboo. Interestingly Arakasha prophecies and legends predict a great hero who will be born without a sar and grow to adulthood with a complete knowledge of the Velo without ever partaking of the blood of another Arakasha. He will live by fate alone as the returning Sar a’Naskara and lead their nation to dominion over Khardan.


Wednesday, 11 February 2015

Introduction to the Arak's


The Arakasha, by Ricardo Bare
May the trial of the Dunes sharpen you
May the Way of Velo guide you
May the entrails of your enemies adorn your styts

          Arakasha Benediction

Greylynn's Bane, Abberant, Unholy, Scourge of Navaaris are all terms used to describe the Arakasha. Their homeland is known to them as the Dek Var, but outsiders call it the Black Sea or the Blight; a blistering hot desert of biting sands as vicious and black as the Arak's souls. This is an infernal land, with a severe climate and treacherous landscape that rejects anything weak, fragile or benign. Even the most innocent looking plant or animal is equipped with some deadly mechanism to ensure its survival; the Arak's fit right in.

Legend has it that ancient Sol’ Väsen Kings imprisoned them in this land, bathed it in the heat of the sun and placed sentinels round about it to keep imprisoned. It was the folly of men that released the Arakasha's from their prison and armed them with knowledge, cunning and magic; weapons that they turned on their captors. Almost to their utter ruin. 


Whether the legends are true, no one knows, but many point to the decaying statues that are found on the desert borders as proof. 


Arakasha's are Mör’ Väsen Barbarians, standing an imposing seven feet tall when fully grown. The black sands of their homeland grow so hot that the bare flesh of a human would begin to cook but the hide of the Arakasha is highly resistant to the extremes of heat. Their dense skin, which shields them against the sweltering sun is naturally black but vicious sandstorms tear away at all of the unprotected areas of their skin exposing a dark crimson layer. 


The abberant appearance of the Arakasha is due to their adaptation to sharp sands, strong winds and furious storms which are so common in the Dek Var; their eyes have two lids, their noses are broad and flat with nostrils on the underside and they have membranes which cover the inner recesses of their ears. For balance while running into the wind they have short heavy tails and their feed are broad and flat.


Long ago, before the domestication of the Moroskaa, the most reliable and still fastest method of travelling the black sands was to run them, and Arakashas are capable of amazing feats as runners. They can travel long distances through the desert quickly with little food or water, which they can go without for long periods of time. 


Perhaps their most recognizable feature, and a locus of their culture, are their "Styts." Within a year of being born all Arak's begin to grow an excess of dense ivory protrusions from the sides of their forearms and elbows, penetrating through the skin in large lumps and knobs. This growth can become quite heavy and irregular, however, the Arakasha shave the ivory into keen spikes, ridges, and blades by using different grades of obsidian rocks and sand. These Styts are incredibly hard and their honed edges make dreadful side arms which the Arakasha employ with lethal skill. 

To be continued.....


Sunday, 1 February 2015

The Väsen

No man, who is not inflamed by vain-glory into enthusiasm, can flatter himself that his single, unsupported, desultory, unsystematic endeavours are of power to defeat the subtle designs and united Cabals of ambitious citizens. When bad men combine, the good must associate; else they will fall, one by one, an unpitied sacrifice in a contemptible struggle.

I would, that it were so easy....

The world of is locked in a struggle. In-corruption puts on corruption and fires her vacuous arrows of righteousness into a darkness she cannot pierce. Not because light cannot rend it asunder but because you cannot play in the dirt without staining your clothes, and she has long been wallowing in filth.

Once, she had many names: Sol'Väsen, guardian, light bringer, slayer of the hordes, bane of the Mör’ Väsen, but she came to the realisation that rent her soul in twain and shattered her faith. Her Väsen, no longer deserved salvation.

At first glance nothing seems amiss, but even the simple common folk can smell the rot in the air. All is not well. Hidden within all of the civilizations, cultures and nationalities of Khardan are the great cabals. No one knows how these machinations came to be, only that they exist in three great combinations called the Väsen. The cabals within each Väsen share similar symbols, iconography, principles and often form political affiliations and orders which can span both races, cultures and broad geographies.

The cabals of the Väsen are most often secret orders, their memberships are guarded jealously and identification is protected by secret knowledge known only by the initiated. Sometimes common key words are used, sometimes signs, tokens or gestures identify members to each other while other less sacred signs are used to identify members of allied cabals. Almost always, there are specific rituals for induction and advancement within these orders as well as emergency calls that identify a brother or sister in need of immediate aid.

Sol’ Väsen – These Väsen often bear the symbol of the Celestial Sun. The Sol’ Väsen are the so called righteous defenders of peace, order, freedom and truth. When Sol’ Väsen are immortal species they are often ancients, who remembering the tyranny of darker times strive for the rule of law as a provider of peace and harmony. The Sol’Väsen are not, however, all benevolent. Their long struggle against the Mör Väsen has tainted many of them. They are likely to be as oppressive, dictatorial and corrupt as they are peaceful and benevolent.

Jor’ Väsen – The Väsen of the lesser light or false light, bear symbols of the moons, stars and flame, The Jor’ Väsen are somewhat benevolent and include those who may be both sympathetic and apathetic to the highly vaunted principles of morality, but are not wholly evil. Jor’ Väsen do not thrive in the full light of the Celestial but they also shun the Darkness. Jor’Väsen fight as often for what suits them as for what they believe is right. Often that can mean allying with the Mör’Väsen as often as the Sol’Väsen.

Mör’ Väsen – The brotherhoods of eternal Night vary widely in their symbols and standards and are not always easily identifiable. The Mör’ Väsen consist of combinations that are of varying degrees of wicked from the malicious to the malignant. They are not all wholly evil, but they thrive and draw power from the darkness, from chaos and the true freedom that comes from living in shadow and anonymity.


Within both the Sol’ Väsen and Mor’ Väsen exist terrorist-like extremists. These individuals exhibit the most extreme ideological characteristics of their groups and are distinguished from the others by the name prefix Ren. i.e. a Ren Mör’ Väsen denotes an extremely evil character while a Ren Sol’ Väsen would be either an extremely righteous character or at least self-righteous. 

Sunday, 25 January 2015

Redesigning the Setting: Drawing the Satellite View Map, 5

Continuing in the series we are going to start with creating some very important masks.

Creating the Land and Sea Masks

Before we modify anything let's create a backup of our Coastlines layer by duplicating it and naming the copy "Map Outline." Then toggle the visibility of the Coastlines layer so that it is not seen.
Layers (Coastlines) > Duplicate Layer (Name "Map Outline")
Layers (Coastlines) > Hide

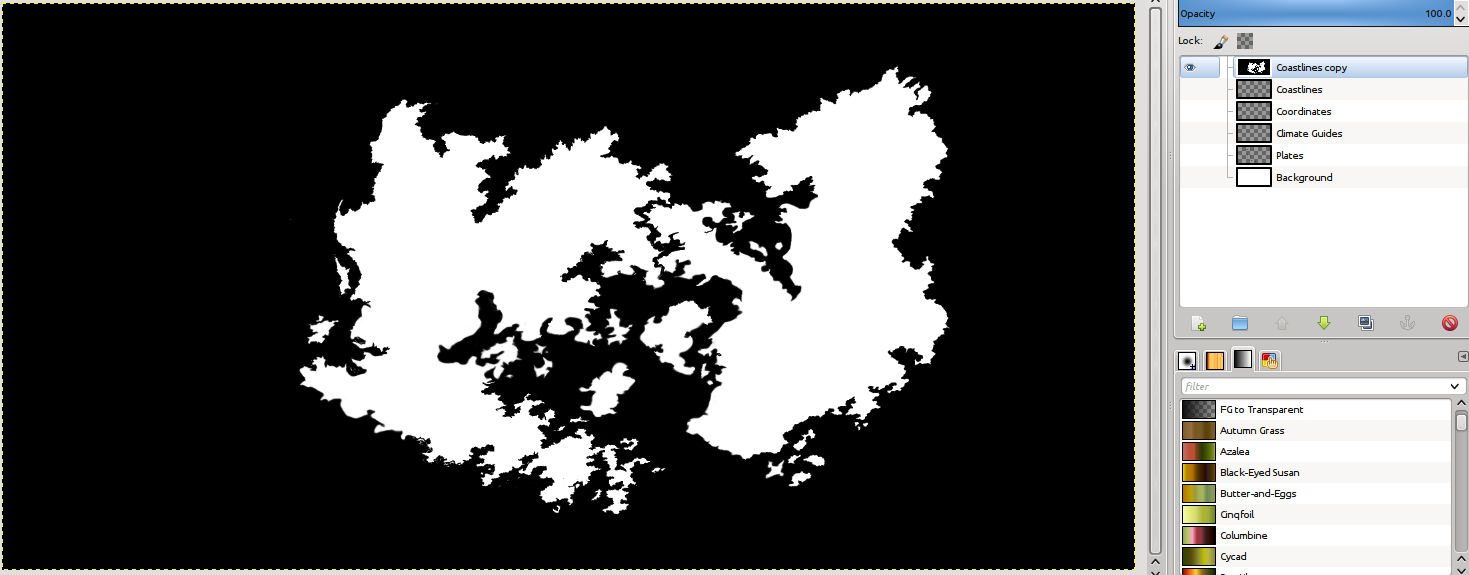
On the "Map Outline" layer we are going to fill the land in with white and the seas in with black. Ensure that the "Map Outline" layer is active and take your bucket fill tool and fill in the land and seas. 
Bucket Fill (Black) > Click on the area outside of the land
Bucket Fill (White) > Click on the land 

Ensure that you have clean black and white boundaries before moving on (i.e. the land and sea should be flat white and black around the borders, no grey or shading.) Now, let's create the masks. On the "Map Outline" layer, select the Select by Color tool (Threshold 0) and click on the land (white) area.
Layer (Map Outline) > Select by Color (Threshold 0) > Click on Land

Now go to the Select menu tab and click on Save to Channel; name this channel “Land Mask”.
Select > Save to Channel (Name Land Mask)

We are going to repeat this process for the sea. On the "Map Outline" layer, select the Select by Color tool (Threshold 0) and click on the sea (black) area.
Layer (Map Outline) > Select by Color (Threshold 0) > Click on the Sea

Now go to the Select menu tab and click on Save to Channel; name this channel “Sea Mask”.
Select > Save to Channel (Name Sea Mask)

That is for today, next time we'll continue with beginning to create the Height Map.

Friday, 23 January 2015

Redesigning the Setting: Drawing the Satellite View Map, 4

Now that we know about winds, climate zones and tectonic plates we are ready to draw the outline of our map. I prefer to draw the map with some markers for latitude and longitude so that I know what the climate will be in those areas. To do this, add a layer called coordinates
Layer > New Layer > Transparency (Name Coordinates)
Pencil > Brush (2. Hardness 100) > Colour Black

Now, using the Gimp guidelines, rules and a pencil tool draw the latitude and longitude lines at regularly spaced intervals. If you want, you can get fancy and label them. See how I've done set this up below:
Images in construction with Longitude and Latitude lines
One you've drawn your lines to reference Longitude and Latitude you can remove the blue guidelines. Now, add a new transparent layer named Coastlines and put just under the Coordinates layer. Generally we will keep the Coordinates layer at the top of our layer stack.
Layer > New Layer > Transparency (Name Coastlines)
Pencil > Brush (2. Hardness 100) > Colour Black

Now, using what you've learned, with the Coastlines layer selected, draw your continents and coastlines. You can see my completed coastline layer below.

Coastlines completed

Tuesday, 20 January 2015

Redesigning the Setting: Drawing the Satellite View Map, 3

Last time we ended with a GIMP drawing with a transparent layer for your plates. I was going to skip right to drawing the outline of the continents until I realized that I was missing a step and that is understanding where the general climate zones will be. Both together are important and here's why:
Subduction Zone - Rocky Mountains

  • On coastlines where you have mountains near the water, those coast lines will tend to be more jagged especially the closer you get to the poles.) That said, even when you have mountains running parallel to a coast line you could still have smooth sections of coast line. This is because where 2 plates collide and form mountains will not always be right at the edge of the water. A subduction zone will often start out a distance at sea and the lighter rock of the continent will stay above it. See the image to the right.
  • In the areas where you have deserts meeting coastal areas, tropical beaches, etc. you will likely have smoother coastlines due to long stretches of sand. This isn't always true of course but it's a good rule of thumb. That means you need to understand, generally where these areas will be on you map. 
The earth has a number of climate zones that correspond roughly to specific latitudes. Whether they are damp or dry will also depend on the atmospheric geography of those areas. See the image to the right. You'll notice correspondences between damp tropical regions and desert regions because of where the winds are carrying moisture and dropping it. Reference the diagram below. You'll see the directions of the winds and the high and low pressure zones. At HIGH pressure zones you have dry air that has cooled falling back down to the surface. Because it has little to no moisture the areas where this air falls are likely to be dry. As the air moves across land and water it will become more humid, carrying more water vapour. It will eventually lose that moisture as rain or fog when it cools and looses its ability to carry that water vapour. It will cool when it gets forced to a higher elevation by a land formation such as a mountain or at a LOW pressure zone or when it meets a cool body of air. This diagram will also help you understand the wind patterns and how maritime peoples on your continent might get around by ship (i.e. where your tradewinds will be.)
The last item you need to be aware of is the heating of the earth due to the Sun, it is the combination of the heating of the atmosphere and spin and tilt of the earth that drives the climate. So, as you draw your coast lines, you'll want to have a general idea of which latitudes your continent span and what the climate is like around those areas. What I did was to add some drawings like these as layers to my image and set the opacity low as I was drawing my coastline so that I had a reference point. We'll talk more about that in the next post.

Saturday, 17 January 2015

Nightmares with dreams of hope; what is Lycadican?

Lycadican is a role playing game with both fantasy and horror thematic elements. When I think about what this means my mind whispers to me "Nightmares with dreams of hope." The mood of Lycadican could very well be summed up by things I've experienced a lot of lately, sleeplessness, waking suddenly from nightmares with a sense of impending terror pierced by cherished moments of peace and a desperate hope.

I've had a lot of nightmares and a lot of dreams but for 20 years there are some that have stayed with me. No matter what I was doing or what I was aspiring to these ghosts have always possessed me.

Soucouyant
The first was a role playing game that brought the fantastic possibilities of magic and the supernatural to life. Not with conventional wizards that need to memorize spells and priests who pray to gods for 'blessings' that are essentially spells; but instead one where magic of all kinds and forms could exist in a way that is connected to the fabric of life. One that engages players to be the creative forces behind their own magical practices. Player characters should have their own arcane tomes and these they should covet greedily, passing their secrets on only to other characters they choose to mentor.

Loup Garou
The second was a way to infuse the fantasy I read with the superstition from my childhood, but not in a familiar way. It should be something new with echos of the familiar. It should be fantasy but feel somewhat like a story of the supernatural; fantasy but feel like horror. I wanted to create something new and someone once told me that my greatest strengths would be in my own experience.

At an early age my life was consumed by stories and a belief in the reality of the supernatural. In the dark of night my brothers and cousins told each other terrifying stories of evil spirits and tales of Caribbean monsters like the Soucouyant and Loup Garou. Our parents followed superstitious practices designed to ward off or keep these unholy forces at bay and we had what we believed were direct interactions with evil spirits. At times our home was besieged by the forces of darkness. We had dreams of evil portents and called holy men to say prayers and lay blessings to guard us. I still recall as vividly as if it were yesterday, being attacked by evil spirits on a number of occasions as a young child. Now we have a scientific word for that, sleep paralysis, but it was so terrifying that it has forever embedded itself into my consciousness.

But that was a long long time ago, a time that seems as much a disturbing dream you had a week ago than something you lived.

I grew up and forgot all about the magic of my past. I went to university and there was a logical/rational explanation for everything. But those ghosts were never exorcised; I studied Anthropology, Religious Studies and Archaeology. Then I got married, had kids and took a career in technology. Like a Soucouyant I shed my old skin and blazed a new trail of the rational and practical. I never told my children about evil spirits. I didn't play another role playing game for more than 20 years. I became a successful enterprise architect (IT super geek) and yearned to become an entrepreneur.

Corrupted Angel
Then a few months ago I stopped sleeping and when I did I dreamed terrible dreams. In one of those
dreams I saw the heavenly light of the world dim and the forces of darkness from my childhood spilled out from the recesses of my mind where they had stayed, locked away. The light fought to hold it back but it could not. The light had become just as corrupt as the darkness and in so had lost all moral authority to rebuke it. When I awoke the following thought came to mind:

"He who fights monsters should see to it that he himself does not become a monster. And if you gaze for long into an abyss, the abyss gazes also into you."
— Friedrich NietzscheBeyond Good and Evil

This is Lycadican, a fantasy horror game that weaves magic and myth together; where the world is slipping into nightmare and the light has become the very thing it was fighting. You can no longer distinguish between good and evil which is unfortunate because evil will follow you home and strangle you in your sleep if you do not know how to ward it off.


Friday, 16 January 2015

Redesigning the Setting: Drawing the Satellite View Map, 2

Creating your Map, Preliminary 

Ok, lets get to work. Fire up the Gimp and open a new image. I recommend that you start with a map that has dimensions that are a 2:1 ratio (twice as wide as it is high) and is in landscape mode. (My map is 3400 × 1700 at 300dpi). If you go much larger than that you will have to play with the settings as we go along.


Notes on larger maps

When it comes to using Wilbur, you'll need the 64-bit version if you have a map with a resolution larger than what I'm using. Also, be aware that maps at higher sizes and resolutions are a lot larger and require faster computers with more RAM. I didn't have any issues on my computer (I have an i7 Haswell with 16GB of RAM.)

This should be what you see with your default image (an image with one single layer that is White.)
New Gimp Image

Conventions

As we go along I'm going to follow Arsheesh's convention of offering explanatory text describing our actions followed by a highlighted summary of specific actions we will be taking. So, if I say that we are going to create a new Layer that is filled with White and name it 'Background' you'll see it presented like this:
Layer > New Layer > While (Name Background)

Bringing in the Plates

If you haven't already, you are going to want to create a new transparent layer named "Plates" and either bring in the plates you draw in our earlier blog post or draw them quickly here with a Pencil tool.

Layer > New Layer > Transparency (Name Plates)
Pencil > Brush (2. Hardness 100) > Colour Black

Now draw your plates with the plate boundaries. Mark which types of boundaries those are, remembering that if you have a spreading center on one side that the opposite side will be a converging boundary that is pushing into another plate. A screenshot of my basic plates (I was only drawing the region around my continents and not the entire planet) is below.

Plates

Thursday, 15 January 2015

Redesigning the Setting: Drawing the Satellite View Map

Apparently, according to my wife, my posts are way too long. So I'm going to break things down into smaller bite sized pieces. Before I do that, I want to thank the folks over at The Cartographers Guild for their all of their help and assistance.

This effort is going to span multiple posts and in constructing our map we are going to use The Gimp and the Wilbur mapping tool. If you want to follow along I'm going to try this tutorial style so go ahead and get those tools installed. Also, you will need the following Gradients installed.

I generally followed a tutorial from a Arsheesh on the guild website called Eriond - A Tutorial for GIMP and Wilbur to create a satellite view style map, but I made a fair number of modifications. I'm going to follow his pdf in style and convention.

But that's all for today, don't want to make these posts too long! Come and see us again tomorrow for more!


Wednesday, 14 January 2015

Redesigning the Setting: Environment, Part 2

In our previous post we looked at the very beginnings of understanding how to create the setting and talked in a little bit of detail about plate tectonics. The next step is determining the plates for your world, your land forms, continents, etc. In hindsight I suggest doing this for your entire planet, whereas I only did this for the area specifically around the major continent I will be working on. This level of detail is not mandatory, but I found it does help guide you in the right direction and it will help with the cultures that live in these areas. For example, a culture that lives in an area that has a lot of earthquakes is probably going to have some belief around why they occur and how they can attempt to control it. It may be that they occur because a God or spirit is angry, if so, how do they appease that entity?
Early Version of Khardan's Plates

Earths Major Plates and Directions

I started with drawing plates and figuring out the boundaries and how they were moving. Remember that some will push and others will collide and some will move past each other. The drawing to the right shows where I put the boundaries in this early draft. In general I also attempted to figure out or detail the direction a plate was moving with an arrow in the plate. The direction should take into account all the different forces acting on a plate. A plate can be pushed from multiple sides and that will determine direction. There are ways to calculate this precisely I suppose but I just eyeballed it.

Once I had the plates worked out then I overlaid my basic desired land forms and marked off where I would have mountains, some faults, etc. This can be seen in the drawing below. Ultimately I chose not to go with this configuration, but it's not bad overall. I'll go into what I did use in the a future post.


Early map of Khardan with plates and some basic features marked off.

Redesigning the Setting: Environment, Part 1

When I dusted off Lycadican version 5 and looked under the covers I decided that I was going to leave all possibilities on the table for making changes to the setting. After all, version 5 was conceived when I was a teenager in the early 90's... and it shows. In that time I was fortunate enough to meet Ricardo Bare and others who helped shape my understanding of game and setting design. Now, Ricardo is a professional game designer, at that time he was not, but he had a strong intuition of how things should be done. Not long after discussing approaches with him I took a large number of classes in Anthropology and Religious Studies which (with a couple classes on Archaeology) helped to further a naturalistic approach; which is, that a fundamental component of how peoples and cultures are shaped comes entirely from their environment, how they have adapted to it and how they relate to it.

Back to our regularly scheduled programming ;)

The first thing I started with is reshaping the environment. If you do not have a strong background in geography, I certainly do not, then the easiest thing to do is to start with the premise that your planet is roughly the same size and composition as the earth with approximately the same proportion of land and water. That way, you have a reference model for the underlying mechanisms of how climate works. You don't have to understand all of the mechanisms driving climate and climate change. Your result isn't necessarily going to be exact and it doesn't have to be, this is Fantasy after all, but it gets you going in the right direction.

Earths Plates
The first stop is tectonic plates. I think it somewhat relevant that you have a general understanding that the planet is made up of plates of lighter rock (lithospheric) that basically float over top of denser molten rock (asthenospheric) underneath. They move around primarily due to the convection current of the heavier molten rock within the earth. Most plates will have dry land masses on top of them that will form your continents or at least parts of your continents (i.e. these land forms are of high enough elevation that they aren't completely covered by water.) Some plates may be entirely underwater.

The plate boundaries are where much of the magic happens. I recommend watching the youtube video below for a great overview.


But... if you don't here's a summary...

Some boundaries will be spreading centers, where liquid rock from the asthenosphere is brought up and the plates move apart. Two notable spreading centers in the ocean are the Mid-Atlantic Ridge and the East Pacific Rise but spreading centers can also exist on land. The East African Rift Valley represents a boundary where a large portion of lithosphere is breaking off of the African continent. At spreading boundaries the crust is thin and there is a lot of volcanic activity. On Earth, most of this happens underwater. Volcanoes can also happen in a middle of a plate because there is are hot spots under the crust in some places, but that is not as common as on plate boundaries. (But as a plate moves across a hot spot you will also get Volcanoes.) This can form island chains.

Other  boundaries will be where the plates collide (converging boundaries) and some plates can be forced underneath others. When this happens these are called "subduction zones" and are where the crust of one place is forced down under another and melts. This molten, less-dense rock, however, likes to rise toward the surface and can form volcanoes or help to build high mountain ranges (or both.) When one plate is forced under the other it also help push some of the material in the other up higher. The Andes Mountains are a direct result of this collision. Where some plates collide you may get deep trenches. The most extreme example is the Peruvian Trench along the western edge of South America. Here, the Nazca Plate is being forced beneath the South American Plate. Trenches, however, do not always form because the rock that the continents are made is generally lighter. 

There are other converging boundaries where there is no volcanic activity because both plates are continental plates and they weight the same. Here there is no subduction, just massive deformation along the edges of the plates. A good example is the Himalayan Mountains where the European and Indian plates meet. Here the plates have caused the crust to buckle, wrinkle and uplift into the highest mountain range on earth.

There are also a few boundaries where plates are just sliding past each other (transverse boundaries.) In this case there is a lot of tension where the two plates are sliding and scraping past each other. The result is cracks in the crust called faults. As the plates move past each other some chunks of crust and overlying rock are broken into fault blocks. When there is a big enough movement along the cracks or faults in the earth's crust we feel it in the form of earthquakes.